Author

VeganLifeTips

Browsing

Welcome to this vegan chickpea falafel recipe! If you’re a fan of Middle Eastern cuisine and looking for a plant-based version of the classic falafel, then this recipe is for you. Made with chickpeas, herbs, and spices, these vegan falafels are flavorful, crispy, and packed with protein. They’re also easy to make, requiring just a few simple ingredients and minimal prep work. Whether you’re an experienced cook or a beginner, this recipe is straightforward to follow and yields delicious results every time. So let’s get started and whip up a batch of these vegan chickpea falafels!

Vegan Falafel

Prep Time 40 minutes
Cook Time 15 minutes
Total Time 55 minutes
Servings 8
Calories 129
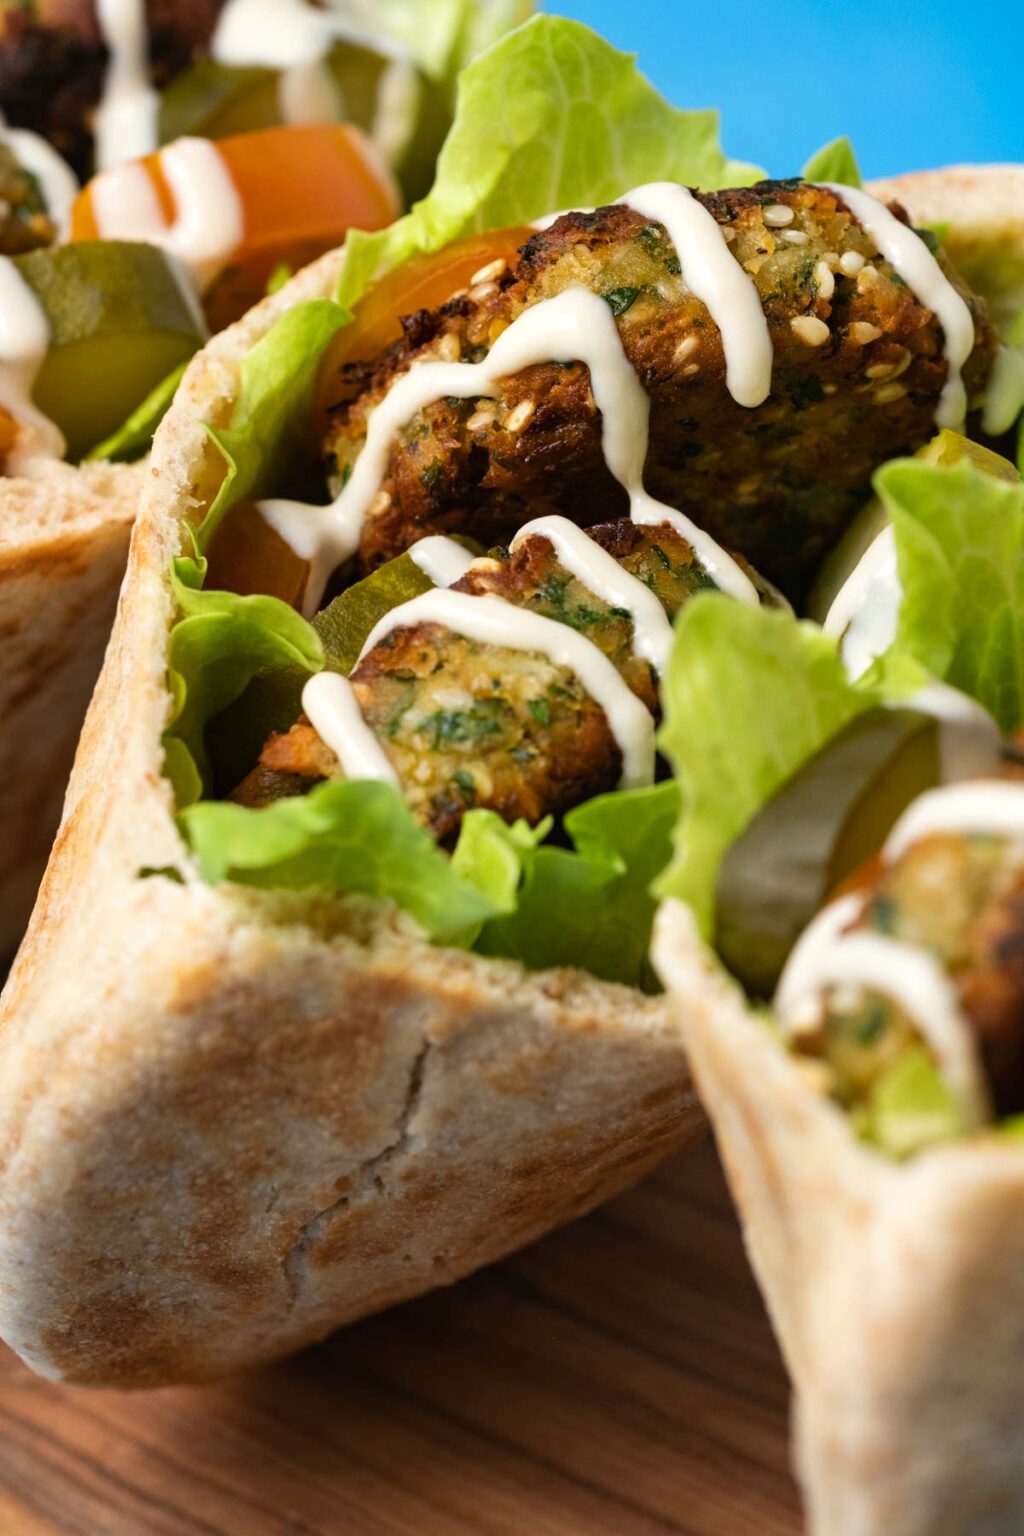
Vegan Chickpeas Falafel is a delicious and healthy snack. This vegan falafel recipe is quick, easy, and fun to make.

Ingredients

For the Falafel:

  • 1 15 oz 425g Can Chickpeas (~1 and 1/2 cups Drained*)
  • 1/2 Medium Onion White (Yellow or Brown, Chopped)
  • 3 Cloves Garlic Crushed
  • 1/3 cup Cilantro Finely Chopped
  • 1/3 cup Parsley Finely Chopped
  • 2 Tbsp White Sesame Seeds
  • 1/2 tsp Salt
  • 1/2 tsp Ground Black Pepper
  • 1/4 tsp Cayenne Pepper
  • 1/4 tsp Coriander Powder
  • 1 tsp Cumin
  • 2 Tbsp All Purpose Flour*
  • 4 Tbsp Olive Oil Divided (For Frying)

For Serving (Optional):

  • Pita Breads
  • Lettuce
  • Cherry Tomatoes Sliced
  • Pickles Sliced
  • Hummus
  • Tahini Sauce

Instructions 

  • Drain canned chickpeas and dry them on paper towels. Add the chickpeas to the food processor along with the chopped onion and crushed garlic and process until roughly chopped.
  • Add the finely chopped cilantro and parsley, white sesame seeds, salt, ground black pepper, cayenne pepper, coriander powder and cumin and process again until roughly mixed.
  • Add the all purpose flour and process briefly.
  • Roll the mixture into balls and place them onto a parchment lined baking tray.
  • Use a small square of parchment paper and the bottom of a glass to gently flatten the balls.
  • Place into the freezer for 20 minutes to firm up.
  • Add 2 Tbsp olive oil to a frying pan and when the oil is hot, add in 4 falafels (providing your pan is big enough to fit all 4). Fry until crispy and browned on each side, about 3 minutes each side.
  • Place the falafels onto paper towels to absorb excess oil.
  • Add the remaining 2 Tbsp olive oil to the pan and when hot, add in the remaining 4 falafels and cook until browned and crispy.
  • Serve with pita breads, lettuce, cherry tomatoes, pickles, hummus and tahini sauce.

Notes

*Dry the chickpeas on a paper towel. It's important that you drain the canned chickpeas really well, and ideally also dry them off more using paper towels. We're not using a lot of flour in this recipe so making sure the canned chickpeas are well drained and dried off keeps your falafel from being wet inside. 
*Make them gluten-free. You can easily make these falafels gluten-free by using a gluten-free all purpose flour blend that is meant to replace regular wheat flour. 
*Bake them instead. You can also bake these falafel. Place them on a parchment lined baking tray and bake at 350°F for 15 minutes then flip them and bake on the other side for 10-15 mins.
*Storing: Leftover falafel keeps very well in the fridge for 4-5 days.
*Prep time includes the time spent chilling in the freezer. 
*Nutritional information is for falafel only and excludes anything they're served with. 

Nutrition

Serving: 1 Falafel (of 8) | Calories: 129kcal | Carbohydrates: 10.4g | Protein: 3.3g | Fat: 8.6g | Saturated Fat: 1g | Sodium: 225mg | Fiber: 2.3g | Sugar: 1.5g
Calories: 129kcal
Course: Lunch, Snack
Cuisine: vegan
Keyword: chickpeas, vegan falafel, vegan recipes

Welcome to this vegan chocolate chip cookie recipe! If you’re a fan of the classic chocolate chip cookie but looking for a plant-based version, then this recipe is for you. Soft, chewy, and packed with chocolate chips, these vegan cookies are the perfect treat for any occasion. They’re also easy to make, requiring just a few simple ingredients and minimal prep work. Whether you’re an experienced baker or a beginner, this recipe is straightforward to follow and yields delicious results every time. So let’s get started and whip up a batch of these vegan chocolate chip cookies!

Vegan Chocolate Chip Cookies

Prep Time 20 minutes
Cook Time 12 minutes
Total Time 32 minutes
Servings 20
Calories 174
Learn how to make delicious vegan chocolate chip cookies with no animal products. This recipe is vegan, gluten free, and grain free. Perfect for breakfast or a snack.

Ingredients

  • 1/2 cup Vegan Butter (112g)
  • 1 cup Light Brown Sugar (200g)
  • 1/4 cup Soy Milk (60ml or other non-dairy milk)
  • 1 Tbsp Vanilla Extract
  • 2 cups All Purpose Flour (250g)
  • 1 tsp Baking Soda
  • 1 tsp Baking Powder
  • 2 tsp Cornstarch
  • 1/2 tsp Salt
  • 1 cup Vegan Chocolate Chips (175g + more to press into the tops when they come out the oven*)

Instructions 

  • In an electric mixer, cream the butter and sugar together.
  • Then add the soy milk and vanilla and mix in.
  • Add your flour, baking soda, baking powder, cornstarch and salt to a mixing bowl and mix together.
  • Add the dry ingredients to the wet and mix in by hand (don't use your electric mixer for this part) until properly mixed into a thick cookie dough.
  • Add the chocolate chips and mix in to distribute as evenly as possible.
  • Preheat the oven to 350°F (180°C).
  • Roll into balls and place evenly on a baking tray covered with parchment paper. Aim for 20 cookies.
  • Place into the oven and bake for 10-12 minutes until the edges are set and they are very slightly browned on top.
  • When they come out of the oven, press a few more chocolate chips into the tops of the warm cookies.
  • Allow to cool and firm up directly on the tray.
  • Once properly cooled store in an airtight container.

Notes

  1. Measure your flour correctly using the spoon and level method (spoon the flour into a measuring cup and then level off the top with a knife. Don't scoop it and don't pack it into the cup). Alternatively weigh it on a food scale. 
  2. Cornstarch has a softening effect on baked goods and this contributes to these cookies being very soft and chewy. 
  3. If you can't get vegan chocolate chips then just chop up a bar of vegan chocolate and use chocolate chunks instead. 
  4. Bake for 10-12 minutes for a soft cookie. If you prefer them more on the crunchy side then you can bake them for up to 15 minutes. Ovens do vary though so keep a close eye on them. 
  5. If your cookies didn't flatten in the oven then just flatten them with a fork as soon as they come out of the oven when they're still hot. 
  6. This recipe was first published in 2016. It has been updated with new photos and clearer instructions but the recipe itself is unchanged. 

Nutrition

Serving: 1 Cookie | Calories: 174kcal | Carbohydrates: 25.1g | Protein: 1.9g | Fat: 7.4g | Saturated Fat: 2.9g | Sodium: 194mg | Fiber: 0.9g | Sugar: 13.9g
Calories: 174kcal
Course: Breakfast, Dessert, Snack
Cuisine: vegan
Keyword: vegan baking, vegan chocolate, vegan cookies, vegan recipes

Welcome to this vegan chickpea meatball recipe! If you’re a fan of meatballs but looking for a plant-based alternative, then these vegan chickpea meatballs are for you. Flavorful, protein-packed, and versatile, these meatballs are a delicious and easy meal that can be enjoyed in a variety of dishes. They’re also simple to make, requiring just a few basic ingredients and minimal prep work. Whether you’re an experienced cook or a beginner, this recipe is easy to follow and yields tasty results every time. So let’s get started and whip up a batch of these vegan chickpea meatballs!

Vegan chickpea meatballs

Prep Time 30 minutes
Cook Time 20 minutes
Total Time 50 minutes
Servings 25
Vegan chickpea meatballs are an easy and tasty vegan meatball recipe that can be served with pasta, with pizza, or on its own.

Ingredients

  • 1 Can 15oz/425g Chickpeas (Drained*)
  • 1/2 Small Red Onion Finely Chopped
  • 4 Cloves Garlic Crushed
  • 2 Tbsp Nutritional Yeast
  • 2 Tbsp Soy Sauce
  • 2 Tbsp Tomato Paste
  • 1/2 tsp Smoked Paprika
  • 1/2 tsp Coriander Powder
  • 1 tsp Cumin
  • 1 cup Breadcrumbs
  • 1/4 cup Chopped Parsley
  • Olive Oil For Brushing

Instructions 

  • Preheat oven to 350°F (180°C).
  • Add canned chickpeas to the food processor along with chopped onion, crushed garlic, nutritional yeast, soy sauce and tomato paste. Process until smooth.
  • Add smoked paprika, coriander powder and cumin and process.
  • Transfer the mixture to a mixing bowl and add breadcrumbs and fresh chopped parsley and mix in. Use your hands to form it into a dough.
  • Scoop roughly tablespoon sized amounts of dough, roll them into balls and place evenly onto a parchment lined baking tray.
  • Place the tray into the freezer for 15 minutes so that the balls can firm up.
  • Remove the tray from the freezer and lightly brush each ball with olive oil.
  • Place into the oven and bake for 20 minutes, turning the balls over once at the 10 minute mark.

Notes

*Chickpeas - if you happen to have cooked chickpeas on hand (not canned) then you can use 1 and 1/2 cups. 
*Bake them or fry them. You can either bake or fry these meatballs. If you'd prefer to fry them then heat up two tablespoons of oil in the frying pan until hot and then fry as many meatballs as comfortably fit into the pan. Fry for a few minutes, turning regularly until golden and crispy all over. Repeat with the next batch. 
*Make them oil-free. If you'd like these meatballs to be oil-free then baking would be the best option, you can simply omit brushing them with olive oil. They are slightly drier of course but once served with a sauce that won't matter. 
*Make Ahead: These chickpea meatballs can be made ahead of time. Make them up to the point that they would go into the freezer to firm up for 15 minutes. And then instead of baking them, move them to the fridge for up to 48 hours before baking. 
*Storing and Freezing: Keep them stored in a covered container in the fridge and enjoy within 3-4 days. They can be reheated in the microwave. Baked meatballs can be frozen for up to 3 months. Thaw overnight in the fridge and then reheat in the microwave or frying pan. 
*Prep time includes the 15 minutes firming up in the freezer. 

Nutrition

Serving: 1 Meatball | Calories: 37kcal | Carbohydrates: 5g | Protein: 1.2g | Fat: 1.3g | Saturated Fat: 0.1g | Sodium: 101mg | Fiber: 0.8g | Sugar: 0.7g
Course: Dinner, Lunch
Cuisine: vegan
Keyword: vegan meatballs, vegan recipes

Welcome to this vegan portobello mushroom burger recipe! If you’re a fan of burgers and looking for a plant-based alternative to the classic beef patty, then these vegan portobello mushroom burgers are for you. Juicy, flavorful, and satisfying, these burgers are a delicious and easy meal that can be enjoyed by vegans and meat-eaters alike. They’re also simple to make, requiring just a few basic ingredients and minimal prep work. Whether you’re an experienced cook or a beginner, this recipe is easy to follow and yields tasty results every time. So let’s get started and whip up a batch of these vegan portobello mushroom burgers!

Vegan Portobello Mushrooms Burger

Prep Time 15 minutes
Cook Time 20 minutes
Total Time 35 minutes
Servings 4 burgers
Calories 383
The Vegan Portobello Mushrooms Burger is a delicious and hearty vegan burger that is easy to prepare and incredibly flavourful.

Ingredients

Portobello Burgers:

  • 4 Portobello Mushrooms Stems Removed
  • 1/2 Tbsp Grapeseed Oil*

Marinade:

  • 1/4 cup 60ml Soy Sauce
  • 1 tsp Paprika
  • 2 Tbsp Maple Syrup
  • 1 Tbsp Light Brown Sugar
  • 2 Tbsp Tomato Paste
  • 1/8 tsp Liquid Smoke
  • 1/2 tsp Oregano

Caramelized Onions:

  • 1/2 Tbsp Olive Oil
  • 1 Medium Onion White (Yellow or Brown, Chopped)
  • 1 Tbsp Soy Sauce
  • 2 Tbsp Maple Syrup

Serving:

  • Hamburger Rolls
  • Lettuce
  • Tomato
  • Dill Pickles
  • Avocado

Instructions 

  • Remove the stems from the portobello mushrooms.
  • Prepare your marinade by adding soy sauce, paprika, maple syrup, brown sugar, tomato paste, liquid smoke and oregano to a measuring jug. Whisk together until well mixed.
  • Place the mushrooms on a baking tray or in a shallow dish and brush generously with the marinade on both sides. Leave them to soak in the marinade for 15 minutes.
  • While the mushrooms are marinating, make your caramelized onions. Add chopped onions and olive oil to a frying pan and sauté until the onions are softened.
  • Add soy sauce and maple syrup and sauté with the onions until sticky and caramelized.
  • Heat up a grill pan and then brush it with 1/2 tablespoon of high smoke oil (we used grapeseed oil).
  • Add the mushrooms and fry for around 3 minutes each side at medium heat.
  • Then turn off the heat and brush both sides with marinade.
  • Serve the portobello burgers on hamburger rolls with lettuce, sliced tomato and sliced dill pickles and topped with the caramelized onions and sliced avocado.

Notes

*Grapeseed oil - you can use any high heat oil that has a high smoke point. We used grapeseed oil and that worked very well. 
*Grill pan - you can use a grill pan like we did for your portobello mushrooms but if you don't have a grill pan then a regular frying pan or skillet will work just fine. You won't get the grill lines but everything else will be the same. 
*Leftovers: Keep leftover portobello burgers in a covered container in the fridge and enjoy within 2-3 days. They are not freezer friendly. 
*Nutritional information is for 1 burger (of 4) and includes everything (roll, garnishes, onions, avocado)

Nutrition

Serving: 1 Burger (of 4) | Calories: 383kcal | Carbohydrates: 62.8g | Protein: 11.4g | Fat: 11.9g | Saturated Fat: 2g | Sodium: 1359mg | Fiber: 8.1g | Sugar: 25.7g
Calories: 383kcal
Course: Dinner, Lunch
Cuisine: vegan
Keyword: vegan burger, vegan mushroom burger, vegan recipes

Welcome to this vegan butter chicken recipe! If you’re a fan of Indian cuisine and looking for a plant-based version of the classic butter chicken dish, then this recipe is for you. Using tofu as the protein source, this vegan butter chicken is rich, flavorful, and full of the aromatic spices and creamy sauce that make the original so irresistible. It’s also easy to make, requiring just a few simple ingredients and minimal prep work. Whether you’re an experienced cook or a beginner, this recipe is straightforward to follow and yields delicious results every time. So let’s get started and whip up a batch of this vegan butter chicken with tofu!

Vegan Butter Chickenless With Tofu

Prep Time 45 minutes
Cook Time 20 minutes
Total Time 1 hour 5 minutes
Servings 4
Calories 467
An easy and delicious vegan butter chickenless recipe with tofu. You can easily make this at home with tofu and spices to make delicious butter chickenless.

Ingredients

For the Tofu:

  • 14 ounces 400g Extra Firm Tofu

For the Vegan Yogurt Sauce:

  • 2/3 cup 100g Raw Cashews
  • 1/3 cup 80ml Water
  • 1 Tbsp Lemon Juice
  • 1 Tbsp Apple Cider Vinegar
  • 1 tsp Garam Masala

For the Sauce:

  • 2 Tbsp Vegan Butter
  • 1 Medium Onion White (Yellow or Brown, Chopped)
  • 3 Cloves Garlic Crushed
  • 1 Tbsp Ginger Freshly Grated
  • 1 Tbsp Garam Masala
  • 1 tsp Turmeric
  • 1 tsp Cumin
  • 1/4 tsp Cayenne Pepper
  • 1 cup 240ml Crushed Tomatoes
  • 1 cup 240ml Coconut Cream (Canned*)
  • 1/2 Tbsp Coconut Sugar
  • Sea Salt To Taste

For Serving:

  • Basmati Rice
  • Fresh Chopped Cilantro
  • Lemon Slices

Instructions 

  • Press the tofu either using a tofu press or by placing the tofu onto a plate, put another plate on top of it, and then stack something heavy on top of that, like a heavy pot or stack of books. Then leave it to press for 30 minutes. This makes the tofu as firm as possible.
  • When the tofu is pressed roughly chop it and place it into a mixing bowl.
  • Preheat the oven to 400°F (200°C).
  • Prepare the vegan yogurt sauce. Add the raw cashews, water, lemon juice, apple cider vinegar and garam masala into a blender jug and blend until smooth.
  • Pour this out over the tofu in the mixing bowl and gently toss the tofu pieces in the sauce so that the tofu is evenly spread with the sauce.
  • Transfer the tofu carefully to a parchment lined baking tray and spread it out evenly.
  • Bake in the oven for 15 minutes until lightly browned. Remove from the oven and set aside.
  • Prepare your sauce. While the tofu is baking you can begin your sauce. Add vegan butter to a pot on medium heat and melt the butter. Add chopped onions and sauté until softened.
  • Now add crushed garlic, grated ginger, garam masala, turmeric, cumin and cayenne pepper and sauté with the onions.
  • Add crushed tomatoes and coconut cream and stir well. Bring to a gentle simmer and let it simmer for a few minutes. Reduce the heat and stir in the coconut sugar (for flavor balance). Add salt to taste.
  • Finally, add the baked tofu pieces and fold them into the sauce.
  • Serve with basmati rice, fresh chopped cilantro and lemon slices.

Notes

*Firm or ideally extra firm tofu is needed for this recipe. And then we still press it for 30 minutes to make it super firm. 
*You can also use canned, full fat, unsweetened coconut milk instead of canned coconut cream. 
*Coconut sugar can be replaced with brown sugar. 
*Keep any leftovers stored covered in the fridge for 3-4 days. Reheat on the stovetop or in the microwave. 
*You can also freeze it if you like for up to 2 months. Thaw overnight in the fridge and then reheat on the stovetop or microwave. 
*Prep time includes the time spent pressing the tofu. 
*Nutritional information excludes rice. 

Nutrition

Serving: 1 Serve (of 4) | Calories: 467kcal | Carbohydrates: 21g | Protein: 18.5g | Fat: 35g | Saturated Fat: 16.6g | Sodium: 439mg | Fiber: 3g | Sugar: 8.8g
Calories: 467kcal
Course: Dinner, Gluten-Free, Lunch
Cuisine: Indian, vegan
Keyword: tofu, vegan butter chicken, vegan recipes

Welcome to this vegan banana muffin recipe! If you’re a fan of banana bread but looking for a portable and individual-sized treat, then these vegan banana muffins are the perfect solution. Moist, flavorful, and packed with banana goodness, these muffins are a delicious and convenient snack that can be enjoyed at home or on the go. They’re also easy to make, requiring just a few pantry staples and minimal prep work. Whether you’re an experienced baker or a beginner, this recipe is simple to follow and yields tasty results every time. So let’s get started and whip up a batch of these vegan banana muffins!

Vegan banana muffins

Prep Time 15 minutes
Cook Time 30 minutes
Total Time 45 minutes
Servings 12 muffins
Calories 254

Ingredients

  • 2 cups 250g All Purpose Flour*
  • 1 cup 200g Light Brown Sugar
  • 3 tsp Baking Powder
  • 1/4 tsp Salt
  • 1 tsp Cinnamon
  • 1 and 1/2 cups Mashed Ripe Banana or 337g peeled weight*
  • 1/2 cup 120ml Soy Milk (or other non-dairy milk)
  • 1/4 cup 55g Coconut Oil*
  • 1 cup 100g Walnuts (chopped, plus more to place directly on top of the muffins before baking*)

Instructions 

  • Preheat the oven to 350°F (180°C). Spray a muffin tray with non-stick spray. Set aside.
  • Sift the flour into a mixing bowl and add the light brown sugar, baking powder, salt and cinnamon. Mix together.
  • Add the banana to a blender along with the soy milk and the coconut oil. Blend until smooth.
  • Pour the blended mix over the dry ingredients and mix in.
  • Add the chopped walnuts and fold them into the batter.
  • Divide the batter evenly between the muffin partitions of your prepared muffin tray. Add more chopped walnuts directly to the top of the muffins.
  • Place into the oven and bake for 25 minutes or until a toothpick inserted into the center of one of the muffins comes out clean.
  • Allow the muffins to cool in the tray for a few minutes and then remove them from the muffin tray and transfer them to a wire cooling rack.

Notes

*Measure the flour correctly. The correct way to measure flour is to use the spoon and level method, which is to spoon the flour into your measuring cup and then level off the top with a knife. Don’t scoop it and don’t pack it into the cup. Alternatively, weigh it on a food scale.
*Measure the banana correctly. If you have a food scale, then you can just weigh the peeled banana to get the correct amount. If you don’t have a scale then the best way to measure would be to mash the banana and measure it out in cups. This recipe uses 1 and 1/2 cups mashed banana or 337g.
*Coconut oil can be switched for vegan butter in the same quantity. 
*Walnuts are entirely optional. You can leave them out or swap them for pecans. 
*Mash or blend. We love blending up the banana, coconut oil and non-dairy milk in this recipe as it results in a very smooth batter and even distribution of that banana flavor. However, if you prefer not to get your blender involved, you can simply melt the coconut oil, mash it in with your banana and add to the mixing bowl along with the non-dairy milk.
*Storing and Freezing: The muffins are at their BEST on the day of baking, but leftovers can also be stored in an airtight container at room temperature for 3-4 days or in the fridge for up to a week. They are also freezer friendly for 2-3 months. 

Nutrition

Serving: 1 Muffin (of 12) | Calories: 254kcal | Carbohydrates: 40g | Protein: 4.1g | Fat: 9.4g | Saturated Fat: 3.4g | Sodium: 181mg | Fiber: 2.1g | Sugar: 19.7g
Calories: 254kcal
Course: Breakfast, Dessert
Cuisine: vegan
Keyword: vegan muffins, vegan recipes

Welcome to this vegan banana bread recipe! If you have ripe bananas sitting on your counter and are looking for a delicious and easy way to use them up, this is the perfect recipe for you. This vegan banana bread is moist, flavorful, and packed with banana goodness. It’s also simple to make, requiring just a few pantry staples and minimal prep work. Whether you’re an experienced baker or a beginner, this recipe is easy to follow and yields delicious results every time. So let’s get started and whip up a batch of this tasty vegan banana bread!

Vegan Banana Bread

Prep Time 10 minutes
Cook Time 1 hour
Total Time 1 hour 10 minutes
Servings 1 Loaf
Calories 318
This ‘tried and true’, classic vegan banana bread recipe is moist, healthy, and so easy to make. It’s egg & dairy free, has an oil-free option, and is the best banana bread ever!

Ingredients

  • 2 cups All-Purpose Flour (250g)
  • 1/2 cup White Granulated Sugar (100g)
  • 1/2 cup Light Brown Sugar (100g)
  • 3 tsp Baking Powder
  • 1/4 tsp Salt
  • 1 tsp Ground Cinnamon
  • 1 and 1/2 cups Mashed Ripe Banana (or 337g peeled weight*)
  • 1/2 cup Soy Milk (120ml or other non-dairy milk)
  • 1/4 cup Coconut Oil (55g or Vegan Butter*)
  • 1 cup Walnuts (100g Chopped, plus more to place on top before baking)*)

Instructions 

  • Preheat the oven to 350°F (180°C). Prepare a 9 x 5 inch loaf pan by spraying it with non-stick spray and lining the bottom with parchment paper. Set aside.
  • Sift all purpose flour into a mixing bowl and add white and brown sugar, baking powder, salt and cinnamon. Mix together.
  • Measure the correct amount of banana and add it to your blender jug along with the soy milk and coconut oil (or vegan butter) and blend until smooth.
  • Pour the blended mix over your dry ingredients in the mixing bowl and mix it into a smooth batter.
  • Add chopped walnuts (optional) and fold in.
  • Transfer the batter to your prepared 9x5 loaf pan and smooth down. Add a few more chopped walnuts on top and place into the oven to bake.
  • Bake for 60 minutes or until a toothpick inserted into the center of the loaf comes out clean.
  • Let it cool in the pan for 10 minutes before removing it from the pan and placing it onto a wire cooling rack to cool completely.

Notes

  1. Spoon and level the flour. The correct way to measure flour is to use the spoon and level method, which is to spoon the flour into your measuring cup and then level off the top with a knife. Don't scoop it and don't pack it into the cup. Alternatively, weigh it on a food scale. 
  2. Measure the banana correctly. If you have a food scale, then you can just weigh the peeled banana to get the correct amount. If you don't have a scale then the best way to measure would be to mash the banana and measure it out in cups. This recipe uses 1 and 1/2 cups mashed banana or 337g. 
  3. Mash or blend. We love blending up the banana, coconut oil and non-dairy milk in this recipe as it results in a very smooth batter and even distribution of that banana flavor. However, if you prefer not to get your blender involved, you can simply melt the coconut oil, mash it in with your banana and add to the mixing bowl along with the non-dairy milk. 
  4. Don't overmix the batter. Once you add the wet ingredients in with the dry you just want to mix it until just mixed. Don't over-mix the batter or the texture and/or rise of your loaf may be impacted. 
  5. Make it oil-free: If you'd like this banana bread to be oil-free then you can replace the coconut oil with applesauce in the same quantity (1/4 cup). 
  6. Make it gluten-free: For a gluten-free version of this recipe, please see our recipe for gluten-free banana bread. 
  7. Storing and Freezing: Store it covered at room temperature where it will stay good for a few (3-4) days. If you want it to last longer, then keep it covered in the fridge where it will last for up to a week. It's freezer friendly for up to 2 months. When you're ready for it, let it thaw overnight in the fridge.

Nutrition

Serving: 1 slice | Calories: 318kcal | Carbohydrates: 48.9g | Protein: 4.8g | Fat: 12.5g | Saturated Fat: 5.2g | Sodium: 222mg | Fiber: 2.4g | Sugar: 24.1g
Author: Ayman
Calories: 318kcal
Course: Breakfast
Cuisine: vegan
Keyword: vegan banana bread, vegan bread, vegan recipes

Welcome to this vegan chocolate cake recipe! If you’re a chocolate lover looking for a delicious and guilt-free dessert, then this is the recipe for you. Not only is this cake vegan, but it’s also quick and easy to make, requiring just one bowl and a handful of simple ingredients. The result is a moist, rich, and full of chocolate flavor cake that will satisfy even the most discerning chocolate connoisseur. So let’s get started and whip up a batch of this delicious vegan chocolate cake!


Easy Vegan Chocolate Cake

Prep Time 15 minutes
Cook Time 20 minutes
Servings 10 slices
Calories 234
Experience the ultimate chocolate indulgence with this easy and quick vegan chocolate cake recipe. Made in just one bowl, this cake is sure to become your new favorite. Moist, rich, and full of chocolate flavor, this vegan chocolate cake is the best you'll ever taste.

Ingredients

  • 1 and 1/2 cups 188g All-Purpose Flour*
  • 1/2 cup 43g Cocoa Powder (Unsweetened)
  • 1 cup 200g White Granulated Sugar
  • 1 tsp Baking Soda
  • 1/2 tsp Salt
  • 1 Flax Egg 1 Tbsp Ground Flaxseeds + 3 Tbsp Hot Water*
  • 1 cup 240ml Soy Milk (or Almond Milk*)
  • 2 tsp Vanilla Extract
  • 1/3 cup 80ml Canola Oil (or Vegetable Oil)
  • 1 Tbsp Distilled White Vinegar or Apple Cider Vinegar

Instructions 

  • Preheat your oven to 350°F (180°C). Spray two 8-inch cake pans (see notes for different cake pan sizes*) with non-stick spray and line the bottoms with circles of parchment paper. Set aside.
  • Sift the flour and cocoa powder into a mixing bowl and add the sugar, baking soda and salt. Mix together.
  • Prepare your flax egg by mixing one tablespoon of flaxseed meal with 3 tablespoons of hot water and leave to sit for a minute or so to become gloopy.
  • Add your flax egg, soy milk (or other non-dairy milk), vanilla extract, oil and vinegar to the mixing bowl and mix in. Don't overmix.
  • Divide the batter evenly between the prepared cake pans.
  • Place into the oven to bake for 20 minutes or until a toothpick inserted into the center of one of the cakes comes out clean.
  • Allow the cakes to cool in the cake pans for a few minutes and then transfer them to a wire cooling rack to cool completely before frosting.
  • Frost with our vegan chocolate frosting or a half batch of our vegan chocolate buttercream frosting.

Notes

*Measure the flour correctly. Measure the flour correctly using the spoon and level method - spoon the flour into your measuring cup and then level off the top with a knife. Don't scoop it and don't pack it into the cup. Alternatively weigh it on a food scale. 
*Flax egg. You can replace the flax egg with 3 Tablespoons of applesauce. 
*Cake Sizes: This cake can be adapted for different cake sizes as follows:
  • Three 6-inch round cake pans - bake for 20 minutes.
  • Two 7-inch round cake pans - bake for 25 minutes. 
  • Two 8-inch round cake pans - bake for 20 minutes. 
  • One 9-inch round cake pan - bake for 30 minutes.
  • 9x9 square cake pan - bake for 25 minutes.
  • 9x13 sheet cake - bake for 15-20 minutes. 
*Gluten-Free: If you want to adapt this cake for gluten-free then we've done all the heavy lifting for you already. Check out our gluten-free chocolate cake that adapts this recipe beautifully to create a perfectly moist and delicious gluten-free version.
*Cupcakes: This recipe adapts beautifully to 12 perfect cupcakes. Bake them for 20 minutes. Or check out our classic vegan chocolate cupcakes. 
*Storing and Freezing: Keep it covered at room temperature where it will stay perfectly fresh for a couple of days, or covered in the fridge where it will stay good for up to a week. It's freezer friendly for up to 3 months. 

Nutrition

Serving: 1 slice (of 10) | Calories: 234kcal | Carbohydrates: 37.9g | Protein: 3.6g | Fat: 8.5g | Saturated Fat: 1g | Sodium: 271mg | Fiber: 2.3g | Sugar: 20.2g
Author: Ayman
Calories: 234kcal
Course: cake, Dessert
Cuisine: vegan
Keyword: chocolate cake, vegan cake, vegan recipes

Are you ready for a vegan dessert that’s indulgent, rich, and oh-so-fudgy? Look no further than these vegan brownies! This recipe is perfect for chocolate lovers and requires just a few simple ingredients. With a texture that’s both soft and chewy, these brownies are sure to become a new favorite. Whether you’re a seasoned baker or just starting out, this recipe is easy to follow and yields delicious results every time. So let’s get started and whip up a batch of these irresistible fudgy vegan brownies!

Fudgy Vegan Brownies

Prep Time 15 minutes
Cook Time 40 minutes
Servings 16
Calories 314
These vegan brownies are guaranteed to blow your mind with their rich, fudgy texture. After trying them at home, you'll never go back to store-bought brownie mix! Not only are they delicious, but they're also quick and easy to make, making them is a favourit thing to the whole family.

Ingredients

  • Ingredients
  • 1 and 1/2 cups 188g All Purpose Flour*
  • 1 cup 86g Cocoa Powder (Unsweetened)
  • 1 tsp Baking Powder
  • 1 tsp Salt
  • 3/4 cup 170g Vegan Butter
  • 1/2 cup 90g Vegan Chocolate Chips
  • 3 Tbsp Ground Flaxseed Meal
  • 1/2 cup 120ml Hot Water
  • 2 cups 400g White Granulated Sugar
  • 2 tsp Vanilla Extract
  • 1 cup 175g Vegan Chocolate Chips (plus more to place on top of the brownies before baking)

Instructions 

  • Before you start making your brownies, add the 3 tablespoons of ground flaxseeds to a bowl and then pour over the 1/2 cup (120ml) hot water from the kettle. Leave it to sit while you prepare your other ingredients.
  • Preheat the oven to 350°F (180°C) and spray a 9x9 square baking dish* with non-stick spray and line it with parchment paper so that there is overhang on either side. Set aside.
  • Sift the all purpose flour and cocoa powder into a mixing bowl and add the baking powder and salt. Mix together.
  • Add the vegan butter and 1/2 cup chocolate chips to a microwave safe bowl. Microwave in 30-second intervals, bringing it out to stir every 30-seconds until melted.
  • Now add the flax eggs, white granulated sugar and vanilla extract to the melted vegan butter and chocolate and whisk it in with a hand whisk.
  • Pour this out over your dry ingredients in the mixing bowl and mix into a thick brownie batter.
  • Add the cup of chocolate chips and mix in.
  • Transfer the brownie mix to your prepared 9x9 square baking dish and smooth down.
  • Add a few more chocolate chips directly to the top of the brownies.
  • Place into the oven and bake for 35-40 minutes.
  • The brownies are done when they are dry and shiny on top and a toothpick inserted into the center of the brownies comes out with moist crumbs (or melted chocolate) but not wet batter.
  • Let the brownies cool and firm up for 15 minutes in the pan before using the parchment paper overhang to remove them from the pan and place onto a wooden board. Let them cool completely before slicing.

Notes

*Measure the flour correctly. Use the spoon and level method - spoon the flour into the measuring cup and level off the top with a knife. Don't scoop it and don't pack it into the cup. If you have a food scale then just weigh the flour on the food scale for total accuracy. 
*Don't substitute ingredients. Substituting ingredients doesn't work well in this recipe. Everything works together in this recipe and any substitutions could throw out the balance. 
*Ultra fudgy brownies: Let the brownies firm up in the fridge for ultra fudginess. When the brownies have cooled at room temperature, place them into the fridge for an hour or two before serving. They get ultra fudgy!
*Don't slice them when they're still warm. If you slice the brownies when they're still warm, they can crumble. Make sure they are completely cooled before slicing. 
*Make them in a 9x13 baking pan: You can make these brownies in a 9x13 baking pan, the brownies will just be thinner. Baking time is 25-30 minutes. 
*Gluten-Free: We have not tested these brownies as gluten-free but my best guess would be that a gluten free all purpose blend would work great in place of the regular flour in this recipe. Alternatively, take a look at our vegan gluten free brownies. 
*Storing and Freezing: Leftover brownies can be stored in an airtight container at room temperature or in the fridge for up to a week. They are freezer friendly for up to 3 months. Thaw them overnight in the fridge and let them come up to room temperature on the counter before serving.

Nutrition :

Serving: 1 Serving (of 16) | Calories: 314kcal | Carbohydrates: 48.1g | Protein: 3.2g | Fat: 14.5g | Saturated Fat: 5.6g | Sodium: 261mg | Fiber: 3.7g | Sugar: 34.1g
Author: Ayman
Calories: 314kcal
Course: Dessert
Keyword: brownies, dessert, vegan brownies, vegan recipes